
consider reading this before jumping on this train:
Archives For November 30, 1999
if you are on a distribution based on redhat 6 there are some interesting tools which can help in fine tuning the system for different workloads. e.g. if you’d like to put a database on
your server there a various settings you might want to adjust ( kernel, disks, network … ). if you use the system as a workstation other settings might make more sense ( power saving settings, for example ).
as this blog mainly is about databases i’ll focus there, obviously. first of all you’ll need the software:
yum install tuned
as tuned is a service you’ll need to enable and start it.
service tuned start
chkconfig tuned on
chkconfig --list | grep tuned
let’s see what happend. the main configuration file for tuned is located in /etc:
/etc/tuned.conf
if you take a look at the file you will find a main section and various plugins sections (e.g. DiskTuning or CPUTuning).
next several default tuning profiles have been created:
ls -l /etc/tune-profiles/
active-profile
default
desktop-powersave
enterprise-storage
functions
laptop-ac-powersave
laptop-battery-powersave
latency-performance
server-powersave
spindown-disk
throughput-performance
virtual-guest
virtual-host
each of these directories contains the same configuration files ( ktune.sh, ktune.sysconfig, sysctl.ktune, tuned.conf ) which specify the various settings which will be set once the profile becomes active.
you can list the available profiles with the tune-adm command, too:
tuned-adm list
Available profiles:
- server-powersave
- laptop-ac-powersave
- latency-performance
- default
- desktop-powersave
- enterprise-storage
- virtual-guest
- virtual-host
- spindown-disk
- laptop-battery-powersave
- throughput-performance
Current active profile: default
… which additionally tells us that the default profile is the one which is active at the moment.
another way to check the active profile is:
tuned-adm active
if you want to create a new profile just copy an existing one and adjust the settings you want to:
cp -pr /etc/tune-profiles/enterprise-storage/ /etc/tune-profiles/my_profile
tuned-adm list | grep my_profile
- my_profile
for databases you’ll probably need maximum throughput, so let’s activate the throughput-performance profile:
tuned-adm profile throughput-performance
Stopping tuned:                                            [  OK  ]
Switching to profile 'throughput-performance'
Applying ktune sysctl settings:
/etc/ktune.d/tunedadm.conf:                                [  OK  ]
Calling '/etc/ktune.d/tunedadm.sh start':                  [  OK  ]
Applying sysctl settings from /etc/sysctl.conf
Applying deadline elevator: sda                            [  OK  ]
Starting tuned:                                            [  OK  ]
according to the documentation and the output from above this should change the io scheduler to deadline ( which is recommended for databases ). is this true ?
cat /sys/block/sda/queue/scheduler
noop anticipatory [deadline] cfq
seems to work. does this survive a reboot?
reboot
tuned-adm active
cat /sys/block/sda/queue/scheduler
noop anticipatory [deadline] cfq
very good. no need to adjust this in the bootloader anymore.
if you want to check which kernel settings have been adjusted by activating this profile just have a look at the configuration files:
cat /etc/tune-profiles/throughput-performance/sysctl.ktune
include any kernel setting you need in there and you’re fine.
as profiles may be switched on the fly several profiles activated at different times of the day might make sense, too.

if you are on linux/solaris and sar is configured and running on your system there is a nice utility called kSar which can be used to create graphs of the various statistics sar gathered. this can be very handy if you are looking for peaks and want to have a quick overview what happened on your system.
installing kSar is just a matter of unzipping the provided package and either executing the run.sh script or use java directly to execute the jar file:
java -jar kSar.jar
this will start ksar and you may load the sar files for having a look at the statistics:
 standard
another option is to generate a pdf:
java -jar kSar.jar -input '/var/log/sa/sarXX' -outputPDF today.pdf
 pdf
pdf
and even faster: create a bash function and an alias in your .bashrc:
ksarfunc() {
java -jar PATH_TO/kSar.jar -input "$1" -outputPDF today.pdf
}
alias ksar='ksarfunc'
… and you will be able to quickly generate a pdf for a specific sar file:
ksar /path/to/sar/file
a much more comprehensive tutorial for sar and ksar can be found here.
just a little hint that there is another option than top, which is htop. pre-compiled packages are available for the most distributions.
 htop.sourceforge.net/htop-1.0.2-io.png
check htop’s sourceforge page for a tiny comparison between htop and top.
another ouch with GI 11.2.0.3 on solaris 10 sparc 64bit: if one of your cluster nodes restarts and you can not find any evident reason for it despite some of these entries in the logs:
[cssd(1084)]CRS-1612:Network communication with node1 node (1) missing for 50% of timeout interval. Removal of this node from cluster in 14
.258 seconds
[cssd(1084)]CRS-1625:Node node1, number 1, was manually shut down
[cssd(1084)]CRS-1601:CSSD Reconfiguration complete. Active nodes are node2 .
[ctssd(1117)]CRS-2407:The new Cluster Time Synchronization Service reference node is host node2.
[crsd(1522)]CRS-5504:Node down event reported for node 'node1'.
[cssd(1084)]CRS-1601:CSSD Reconfiguration complete. Active nodes are node1 node2 .
… and:
[ CSSD][20](:CSSNM00018:)clssnmvDiskCheck: Aborting, 0 of 1 configured voting disks available, need 1
[ CSSD][20]###################################
[ CSSD][20]clssscExit: CSSD aborting from thread clssnmvDiskPingMonitorThread
[ CSSD][20]###################################
[ CSSD][20](:CSSSC00012:)clssscExit: A fatal error occurred and the CSS daemon is terminating abnormally
[ CSSD][20]
you probably hit bug 13869978. this seems only to happen if you are on external redundancy for the cluster diskgroup and therefore only one voting disk was created.
two solutions are available:
- migrate the votings disk to an asm mirrored diskgroup ( normal or high redundancy )
- or apply PSU4 on top of 11.2.0.3
there seems to be the same issue on linux.
if you want to manage vips in the grid infrastructure which are not on the default network and you get this: “CRS-2534: Resource type ‘ora.cluster_vip_net2.type’ is not registered” don’t panic, it is easy to fix. basically you need create the “ora.cluster_vip_net2.type”-type before adding the vip with appvipcfg:
./srvctl add network -k 2 -S x.x.x.0/255.255.255.0/igb0
./crsctl start resource ora.net2.network
./crsctl add type ora.cluster_vip_net2.type -basetype ora.cluster_vip.type
./appvipcfg create -network=2 -ip=x.x.x.x -vipname=myvip1 -user=root
./crsctl start resource vip1 -n server1
./appvipcfg create -network=2 -ip=x.x.x.x -vipname=myvip2 -user=root
./crsctl start resource vip2 -n server2
./crsctl stat res –t
./crsctl modify res 'myvip1' -attr "HOSTING_MEMBERS=server1 server2"
./crsctl modify res 'myvip2' -attr "HOSTING_MEMBERS=server1 server2"
not sure, but I think this is a bug as appvipcfg should manage this.
the above is valid for 11.2.0.3 on Solaris SPARC 64bit
linux ( as well as most of the unixes ) provides the ability to integrate many different file systems at the same time. to name a few of them:
- ext2, ext3, ext4
- ocfs, ocfs2
- reiserfs
- vxfs
- brtfs
- dos, ntfs
- …
although each of them provides different features and was developed with different purposes in mind the tools to work with them stay the same:
- cp
- mv
- cd
- …
the layer which makes this possible is called the virtual filesystem ( vfs ). this layer provides a common interface for the filesystems which are plugged into the operating system. I already introduced one special kind of filesystem, the the proc filesystem. the proc filesystem does not handle any files on disk or on the network, but neitherless it is a filesystem. in addition to the above mentioned filesystems, which all are disk based, filesystem may also handle files on the network, such as nfs or cifs.
no matter what kind of filesystem you are working with: when interacting with the filesystem by using the commands of choice you are routed through the virtual filesystem:
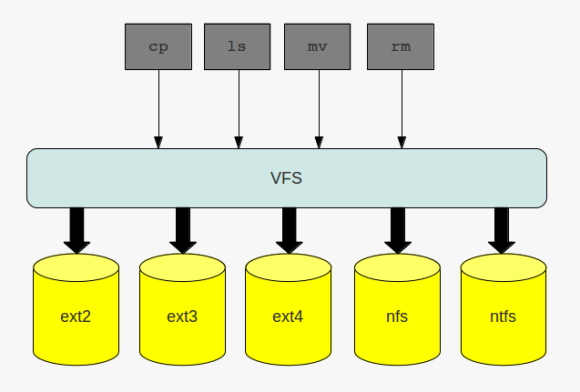 the virtual file system
to make this possible there needs to be a standard all file system implementations must comply with, and this standard is called the common file model. the key components this model consist of are:
- the superblock which stores information about a mounted filesystem ( … that is stored in memory as a doube linked list )
- inodes which store information about a specific file ( … that are stored in memory as a doube linked list)
- the file object which stores information of the underlying files
- dentries, which represent the links to build the directory structure ( … that are stored in memory as a doube linked list)
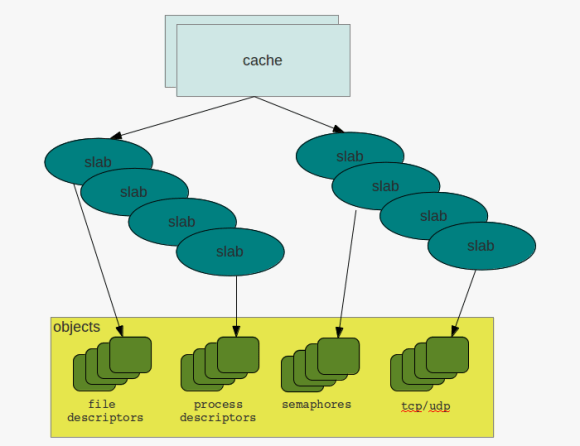
to speed up operations on the file systems some of the information which is normally stored on disk are cached. if you recall the post about slabs, you can find an entry like the following in the /proc/slabinfo file if you have a mounted ext4 filesystem on your system:
cat /proc/slabinfo | grep ext4 | grep cache
ext4_inode_cache   34397  34408    920   17    4 : tunables    0    0    0 : slabdata   2024   2024      0
so what needs the kernel to do if, for example, a request for listing the contents of a directoy comes in and the directory resides on an ext4 filesystem? because the filesystem is mounted the kernel knows that the filesystem for the specific request is of type ext4. the ls command will then be translated ( pointed ) to the specific ls implementation of the ext4 filesystem. this operation is the same for all commands interacting with filesystems. there is a pointer for each operation that links to the specific implementation of the command in question:
 directory listing
as the superblock is stored in memory and therefore may become dirty, that is not synchronized with the superblock on disk, there is the same issue that oracle must handle with its buffer pools: periodically check the dirty flag and write down the changes to disk. the same is true for inodes ( while in memory ), which contain all the information that make up a file. closing a loop to oracle again: to speed up searching the ionodes linux maintains a hash table for fast access ( remember how oracle uses hashes to identify sql statements in the shared_pool ).
when there are files, there are processes which want to work with files. once a file is opened a new file object will be created. as these are frequent operations file objects are allocated through a slab cache.
the file objects itself are visible to the user through the /proc filesystem per process:
ls -la /proc/*/fd/
/proc/832/fd/:
total 0
dr-x------ 2 root root  0 2012-05-18 14:03 .
dr-xr-xr-x 8 root root  0 2012-05-18 06:40 ..
lrwx------ 1 root root 64 2012-05-18 14:03 0 -> /dev/null
lrwx------ 1 root root 64 2012-05-18 14:03 1 -> /dev/null
lr-x------ 1 root root 64 2012-05-18 14:03 10 -> anon_inode:inotify
lrwx------ 1 root root 64 2012-05-18 14:03 2 -> /dev/null
lrwx------ 1 root root 64 2012-05-18 14:03 3 -> anon_inode:[eventfd]
lrwx------ 1 root root 64 2012-05-18 14:03 4 -> /dev/null
lrwx------ 1 root root 64 2012-05-18 14:03 5 -> anon_inode:[signalfd]
lrwx------ 1 root root 64 2012-05-18 14:03 6 -> socket:[7507]
lrwx------ 1 root root 64 2012-05-18 14:03 7 -> anon_inode:[eventfd]
lrwx------ 1 root root 64 2012-05-18 14:03 8 -> anon_inode:[eventfd]
lrwx------ 1 root root 64 2012-05-18 14:03 9 -> socket:[11878]
...
usually numbers 0 – 3 refer to the standard input, standard output and standard error of the corresponding process.
last but not least there are the dentries. as with the file objects, dentries are allocated from a slab cache, the dentry cache in this case:
cat /proc/slabinfo | grep dentry
dentry             60121  61299    192   21    1 : tunables    0    0    0 : slabdata   2919   2919      0
directories are files, too, but special in that kind that dictories may contain other files or directories. once a directory is read into memory it is transformed into a dentry object. as this operation is expensive there is the dentry cache mentioned above. thus the operations for building the dentry objects can be minimized.
another link to oracle wording: the unused dentry double linked list uses a least recently used ( lru ) algorithm to track the usage of the entries. when the kernel needs to shrink the cache the objects at the tail of the list will be removed. as with the ionodes there is hash table for the dentries and a lock protecting the lists ( dcache_spin_lock in this case ).
this should give you enough hints to go further if you are interesed …
to be honest, when I first heard about slabs i thought of kitchens, or a bathroom, but not about memory management. but after reading and started learning about it, this term seemed not to be bad for what it stands for. to stay in the context of a kitchen there are different kinds of slabs:
- some maybe appropriate for the floor
- others for the wall
- there are all kinds of colors …
- … all kinds of sizes
- slabs may consist of different materials
- …
and in a way that’s exactly what slabs, in regards to memory management, are about. they provide regions of memory which are fixed in size and for different kinds of tasks.
the basic idea behind slabs is to avoid fragmentation by reserving fixed size memory regions and minimizing the work for allocation and deallocation. the so called constructor is used to initialize areas if memory while the destructor de-initializes them.
while the system is running the kernel requests memory regions of the same size and type over and over again. the process descriptors discussed earlier are one example. if a new process descriptor gets requested the slab allocator is used to get a memory area from cache which fits for holding the structures. once the process terminates and the descriptor can be discarded the memory region will not be deallocated but can be reused when another process needs to get created. in this way the overhead of frequent allocation and deallocation of pages frames can be avoided.
 caches & slabs
to check the current caches and slabs you can either directly go to the /proc filesystem:
cat /proc/slabinfo
slabinfo - version: 2.1
# name : tunables : slabdata
UDPLITEv6 0 0 1024 16 4 : tunables 0 0 0 : slabdata 0 0 0
UDPv6 32 32 1024 16 4 : tunables 0 0 0 :
… or check the current behavior with slabtop:
 Active / Total Objects (% used) : 305636 / 315218 (97.0%)
Active / Total Slabs (% used) : 11077 / 11077 (100.0%)
Active / Total Caches (% used) : 68 / 99 (68.7%)
Active / Total Size (% used) : 74608.55K / 76732.62K (97.2%)
Minimum / Average / Maximum Object : 0.01K / 0.24K / 8.00K
OBJS ACTIVE USE OBJ SIZE SLABS OBJ/SLAB CACHE SIZE NAME
89193 89192 99% 0.10K 2287 39 9148K buffer_head
55020 54352 98% 0.19K 2620 21 10480K dentry
30260 30247 99% 0.90K 1780 17 28480K ext4_inode_cache
19992 19974 99% 0.08K 392 51 1568K sysfs_dir_cache
17158 16006 93% 0.17K 746 23 2984K vm_area_struct
15360 14165 92% 0.01K 30 512 120K kmalloc-8
10710 10077 94% 0.05K 126 85 504K shared_policy_node
9664 8544 88% 0.06K 151 64 604K kmalloc-64
9051 8118 89% 0.19K 431 21 1724K kmalloc-192
7917 7904 99% 0.59K 609 13 4872K inode_cache
a cache initially does not contain any slabs. slabs will be created once requested and there is no free object to satisfy the request. in this case the cache will grow by n slabs. as with all concurrent access to memory regions caches and slabs are protected by locks, cache spin locks in this case. and when there are locks the must be different states for the objects, that are:
- emtpy
- partial
- full
so what to remember: slabs and caches provide a way to avoid fragmentation and save some work in regards to frequent allocation and deallocation of memory regions. structures that are created and destroyed frequently such as the process or file descriptors benefit from this technique as the requests can be served at much faster time.
due to some network changes we were forced to adjust the interconnect configuration of one our managed grid infrastructure installations today. surprisingly this was a really smooth task, and all that needs to to be done is:
before doing any changes to the network configuration and while the rac databases and grid infrastructure are still running:
backup the current gpng ( grid plug and play ) profile in case you need to restore the old configuration:
cd $GRID_HOME/gpnp/[hostname]/profiles/peer
cp profile.xml profile.xml_bak
shutdown the rac database and listener:
srvctl stop database -d db_name
srvctl stop listener -l listener_name
make the changes to the interconnect configuration:
oifcfg setif -global eth1/10.167.77.0:cluster_interconnect
oifcfg getif
… where eth1 is the interface name for the interconnect and 10.167.77.0 is the new network to use
as root shutdown and disable the cluster stack:
crsctl stop crs
crsctl disable crs
shutdown the servers and perform the physical network changes, if any, start them up again and adjust the hosts file and the interface configurations.
as root user enable and start crs:
crsctl enable crs
crsctl start crs
wait a few minutes and check the cluster status:
oifcfg getif
crsctl status resource -t
that’s it.
a probably less known feature of the oracle database is the database filesystem (dbfs). in short dbfs provides a filesystem interface on top of database tables accessible through standard operating system commands. storing files inside the database becomes as easy as creating files on the operating system level. there is no need to use a programming language to store blobs/clobs inside the database.
for demonstrating dbfs this post will show how to create a subversion repository which actually resides in the oracle database. this is not intended for any production use and shall only show that is basically works.
because I am on linux and want to mount the database filesystem on the operating system I will need to install the kernel-devel and fuse packages and give execute privileges to the fusermount command:
su-
yum install kernel-devel fuse fuse-libs
chmod +x /bin/fusermount
next I’ll create the configuration file for fuse:
touch /etc/fuse.conf
echo "user_allow_other" > /etc/fuse.conf
the mountpoint for holding my database filesystem and subversion repository will be /oradata/DB112/svn owned by the database owner:
su - oracle
mkdir /oradata/DB112/svn
as all the files will reside inside the oracle database I will create a separate user:
su - oracle
sqlplus / as sysdba
CREATE USER svn
IDENTIFIED by "svn"
DEFAULT TABLESPACE USERS
TEMPORARY TABLESPACE TEMP;
GRANT CREATE SESSION TO svn;
GRANT dbfs_role TO svn;
GRANT RESOURCE TO svn;
the script that creates the dbfs “MYSVNFS” which will be stored in the “USERS” tablespace is:
connect svn/svn
@$ORACLE_HOME/rdbms/admin/dbfs_create_filesystem.sql USERS MYSVNFS
the output should be similar to this:
No errors.
--------
CREATE STORE:
begin dbms_dbfs_sfs.createFilesystem(store_name => 'FS_MYSVNFS', tbl_name =>
'T_MYSVNFS', tbl_tbs => 'USERS', lob_tbs => 'USERS', do_partition => false,
partition_key => 1, do_compress => false, compression => '', do_dedup => false,
do_encrypt => false); end;
--------
REGISTER STORE:
begin dbms_dbfs_content.registerStore(store_name=> 'FS_MYSVNFS', provider_name
=> 'sample1', provider_package => 'dbms_dbfs_sfs'); end;
--------
MOUNT STORE:
begin dbms_dbfs_content.mountStore(store_name=>'FS_MYSVNFS',
store_mount=>'MYSVNFS'); end;
--------
CHMOD STORE:
declare m integer; begin m := dbms_fuse.fs_chmod('/MYSVNFS', 16895); end;
No errors.
the client program used to mount the filesystem is called dbfs_client and is located under $ORACLE_HOME/bin. the proper way in regards to security would be to use an oracle wallet for storing the password but as this is only a test I will do it the easy way ( if someone is interested on how to setup the wallet way, just let me know ):
echo "svn" > /home/oracle/passwordfile
nohup dbfs_client svn@DB112 /oradata/DB112/svn < /home/oracle/passwordfile &
if everything worked the new mount is now visible with the os commands:
df -h
Filesystem Size Used Avail Use% Mounted on
/dev/hdc1 28G 11G 15G 43% /
tmpfs 741M 456M 286M 62% /dev/shm
dbfs-svn@DB112:/ 1.1G 160K 1.1G 1% /oradata/DB112/svn
##
ls -la /oradata/DB112/svn/MYSVNFS/
total 0
drwxrwxrwx 3 root root 0 May 4 01:10 .
drwxr-xr-x 3 root root 0 May 4 01:15 ..
drwxr-xr-x 7 root root 0 May 4 01:10 .sfs
now I am ready to create the subversion repository:
su - oracle
cd /oradata/DB112/svn/MYSVNFS/
svnadmin create MYREPO
for being able to access the repository later on from another user I’ll add the user to the subversion password file:
cat MYREPO/conf/passwd
[users]
svn = svn
… and uncomment the following line in the svnserve.conf file:
password-db = passwd
… and start the subversion deamon:
svnserve -d -r /oradata/DB112/svn/MYSVNFS
to simulate real-life subversion usage I will create a new os user and do some work on the subversion repository ( I could have done this from another workstation, too ):
su -
useradd svn
passwd svn
su - svn
the first thing I need to do is to checkout the repository:
svn co svn://localhost/MYREPO/
cd MYREPO
ls -la
lets copy some files ( text and binary ) to populate the repository ( don’t care if not all files are copied because of permissions ):
cp /etc/*.conf .
cp /bin/cpio .
ls -la
as I now have some files I’ll add them to the repository and commit ( commit means pushing to the subversion server here ):
svn add *
svn commit -m "blabla" *.conf --username=svn
svn commit -m "blabla" cpio
done. all files committed to the subversion server and stored inside the oracle database. don’t believe it ?
su - oracle
sqlplus / as sysdba
set lines 164
col object_name for a20
col object_type for a15
SELECT object_name,object_type FROM all_objects WHERE owner = 'SVN';
##
OBJECT_NAME          OBJECT_TYPE
-------------------- ---------------
T_MYSVNFS            TABLE
IG_SFS$_FST_19       INDEX
IP_SFS$_FST_19       INDEX
IPG_SFS$_FST_19      INDEX
SFS$_FSTP_19         TABLE
SYS_C005052          INDEX
##
col item for a30
col pathname for a40
select item ,PATHNAME from svn.T_MYSVNFS;
##
ITEM PATHNAME
------------------------------ ----------------------------------------
MYREPO /MYREPO
locks /MYREPO/locks
db.lock /MYREPO/locks/db.lock
db-logs.lock /MYREPO/locks/db-logs.lock
hooks /MYREPO/hooks
start-commit.tmpl /MYREPO/hooks/start-commit.tmpl
pre-commit.tmpl /MYREPO/hooks/pre-commit.tmpl
post-revprop-change.tmpl /MYREPO/hooks/post-revprop-change.tmpl
conf /MYREPO/conf
authz /MYREPO/conf/authz
db /MYREPO/db
fs-type /MYREPO/db/fs-type
revs /MYREPO/db/revs
0 /MYREPO/db/revs/0
revprops /MYREPO/db/revprops
0 /MYREPO/db/revprops/0
transactions /MYREPO/db/transactions
txn-protorevs /MYREPO/db/txn-protorevs
write-lock /MYREPO/db/write-lock
uuid /MYREPO/db/uuid
0 /MYREPO/db/revs/0/0
0 /MYREPO/db/revprops/0/0
fsfs.conf /MYREPO/db/fsfs.conf
rep-cache.db /MYREPO/db/rep-cache.db
min-unpacked-rev /MYREPO/db/min-unpacked-rev
txn-current-lock /MYREPO/db/txn-current-lock
format /MYREPO/db/format
format /MYREPO/format
passwd /MYREPO/conf/passwd
svnserve.conf /MYREPO/conf/svnserve.conf
pre-revprop-change.tmpl /MYREPO/hooks/pre-revprop-change.tmpl
pre-lock.tmpl /MYREPO/hooks/pre-lock.tmpl
pre-unlock.tmpl /MYREPO/hooks/pre-unlock.tmpl
ROOT /
.sfs /.sfs
attributes /.sfs/attributes
tools /.sfs/tools
snapshots /.sfs/snapshots
RECYCLE /.sfs/RECYCLE
content /.sfs/content
post-commit.tmpl /MYREPO/hooks/post-commit.tmpl
post-lock.tmpl /MYREPO/hooks/post-lock.tmpl
post-unlock.tmpl /MYREPO/hooks/post-unlock.tmpl
README.txt /MYREPO/README.txt
1 /MYREPO/db/revs/0/1
txn-current /MYREPO/db/txn-current
2 /MYREPO/db/revs/0/2
1 /MYREPO/db/revprops/0/1
current /MYREPO/db/current
2 /MYREPO/db/revprops/0/2
that’s the subversion repository stored in the oracle database.
remember this is only for educational purposes, but imagine what you could do with it:
- back up the repository with rman
- use rman to duplicate the database for testing purposes
- setup rac one node, integrate the subversion daemon with the oracle grid infrastructure and make the repository high available
- create multiple dbfs and multiple svn repositories in one oracle database
- enable deduplication for the repository files ( see * )
- enable compression for the repository files ( see ** )
oracle uses secure files to store the files located in the dbfs. this means you may use all the features secure files provide. check the examples for an overview.
*
alter table svn.T_MYSVNFS modify lob(FILEDATA) (deduplicate);
**
alter table svn.T_MYSVNFS modify lob(FILEDATA) (compress high);
as said above, this is only educational but i’d be happy to start a discussion about the pros and cons ( beside the licensing costs, of course ) …. what would be a good use case to use dbfs for ?
